Source : Internet
You need iTunes 8.0.2 to continue... Watch the Video!
For your convenience this tutorial is available in video format also. Click the Watch It button to view the tutorial!
Note: This video tutorial is for the 2.0.2 firmware but it still applies
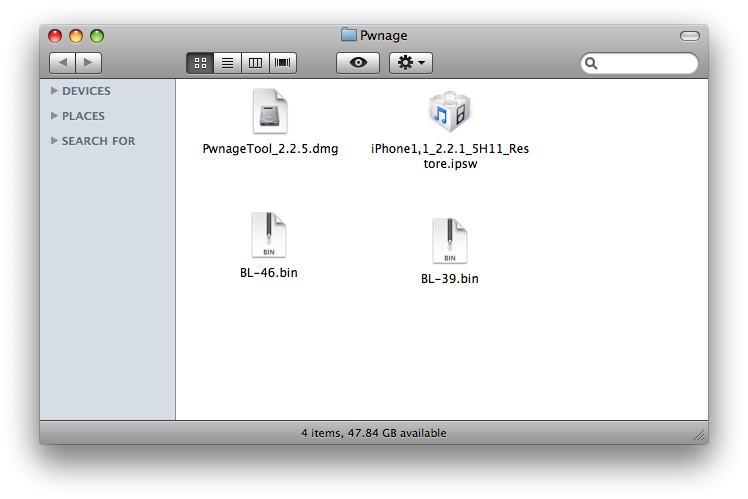
Alright, first make a folder on the desktop. In it, you will need a couple of things. The two bootloader files3.9BL, 4.6BL, and Pwnage 2.2.5, found here or here
You will also need the 2.2.1 iPhone firmware.
2.2.1 (2G): iPhone1,1_2.2.1_5H1_Restore.ipsw
When downloading the IPSW file, it is best to download it with Firefox!
Step One
Create a folder on your desktop with all the required files listed above.

Step Two
Double click to mount the PwnageTool dmg.

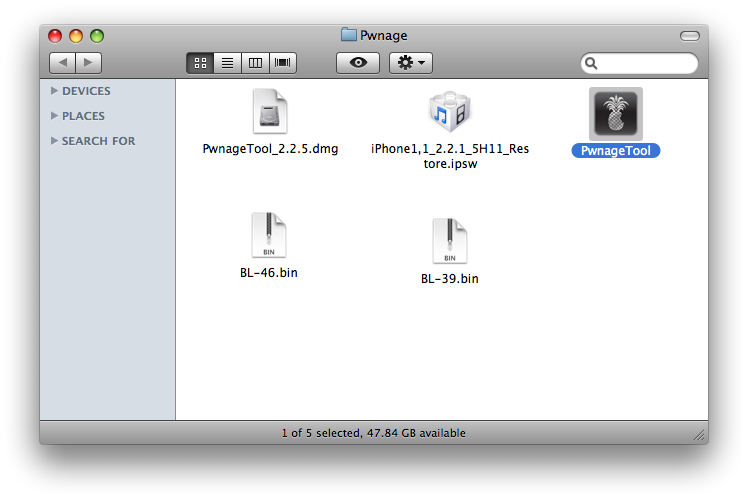
Drag the PwnageTool icon to the Pwnage folder then launch it.

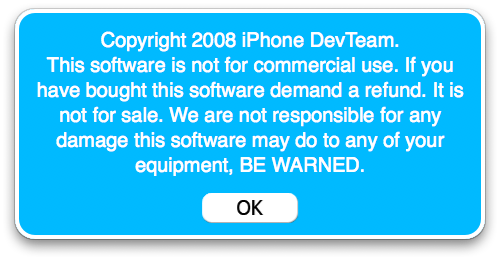
Click Ok if presented with a warning.

Step Three
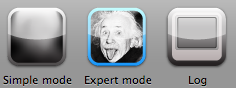
Make sure you click Expert Mode from the top menu.

Step Four
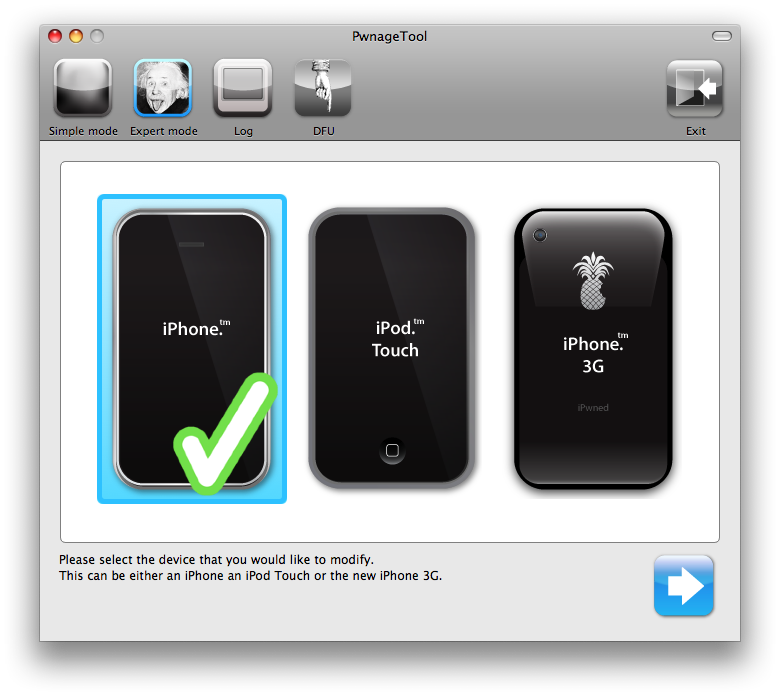
Select your iPhone or iPod from the three devices shown. Notice a large checkmark appears over the selected device. Then click the blue arrow button at the bottom right.

Step Five
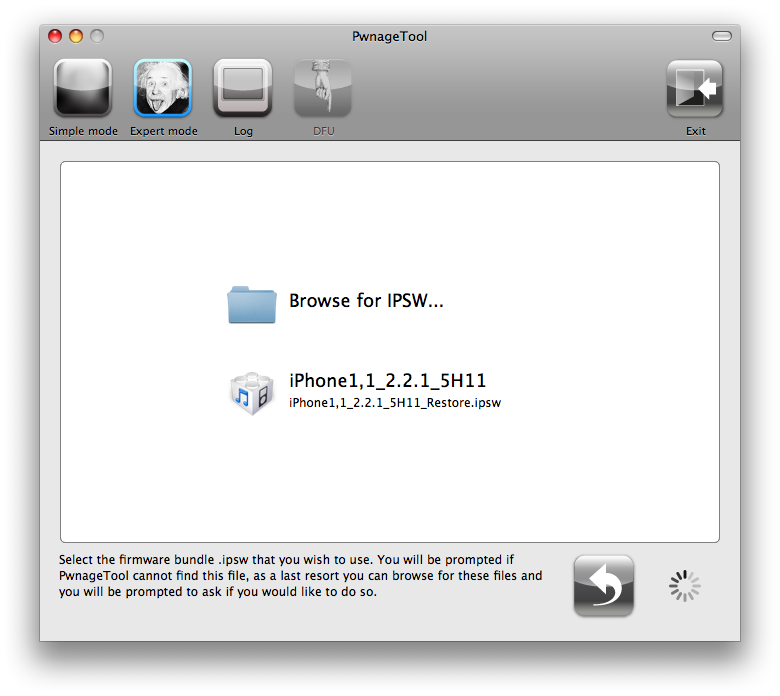
You will be brought to the "Browse for IPSW" page. On my laptop, it automatically found the IPSW. If PwnageTool doesn't automatically find the ipsw file you can click Browse for IPSW... button.

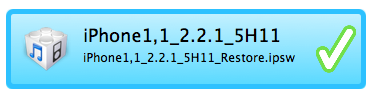
Click to select the found IPSW file, a checkmark will appear next to it. Then click the blue arrow button to continue.

Step Six
You will then be brought to a menu with 7 choices. Click to select General then click the blue arrow button.

The General settings allows you to decide the partition size. Click activate the phone and Disable partition wipe-out. Click the blue arrow button.
***If the Enable Baseband checkbox is not greyed out, checkmark it. This will allow the unlock to occur!***
***For the 2.2.1 firmware you may have to increase the size of your root partition slightly for the IPSW build to be successful. 590MB worked just fine for me***

In the Bootneuter settings, click Neuter bootloader, Unlock baseband, and Auto-Delete BootNeuter.app. It is not necessary to upgrade the bootloader unless you are really feeling the need to be on 4.6. Click the blue arrow button to continue.

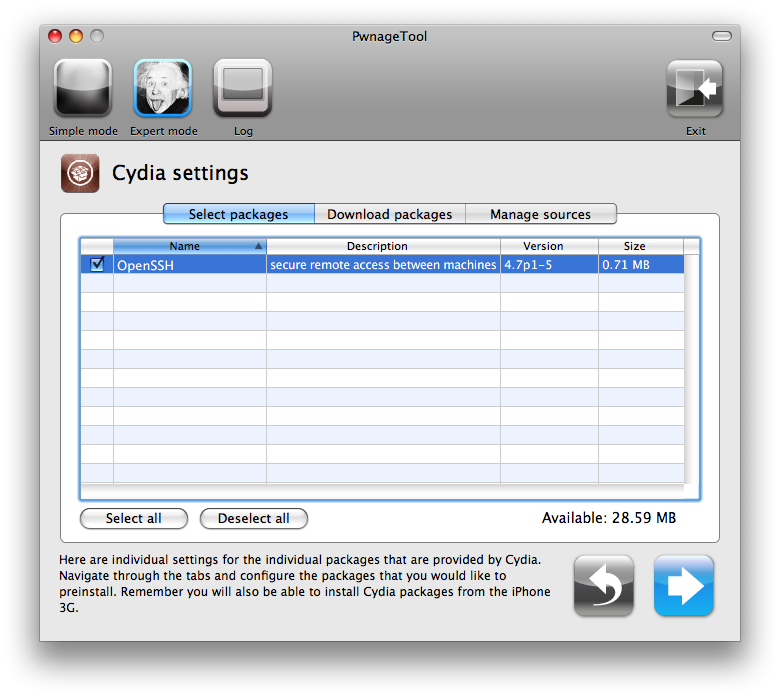
The Cydia settings menu allows you to create custom packages so you do not have to manually install the necessary them later.

Click to select the Download packages tab. Then click the Refresh button to display all the available packages. Double clicking the package you want will download it and make it available in the Select Packages tab.

Checkmark the ones you want then Click the blue arrow button.

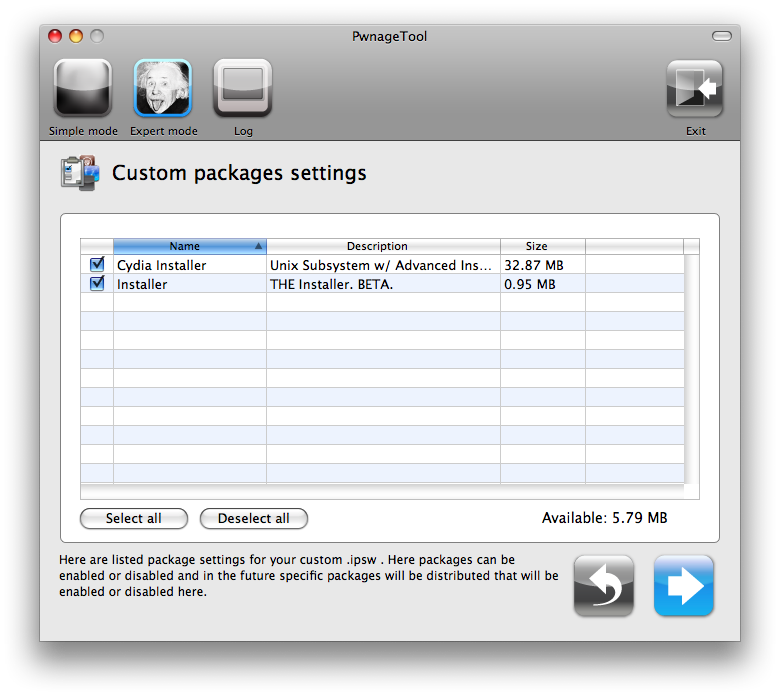
The Custom Packages Settings menu displays listed package settings for your custom IPSW. For know leave these settings as is. Click the blue arrow button to continue.

The Custom Logos Settings menu allows you to add your own images as boot logos. Click the Browse button to select your Boot logo and Recovery logo.

Remember the rules for them: RGB or Grayscale format with Alpha channel and dimension bellow 320x480. If you would like to use the iClarified ones they can be found here: Boot Logo, Recovery Logo

Click the blue arrow button to continue.
Step Seven
You are now ready to build your custom firmware. Click the build button to select it, then click the blue arrow button.

Step Eight
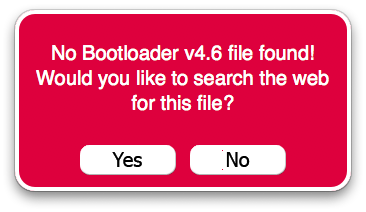
If this is the first time doing this, you will be asked to upload the 3.9 and 4.6 BL files. When prompted to search the web, click no.

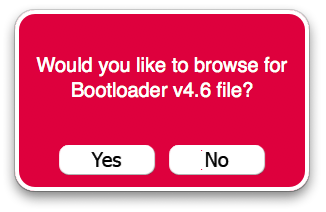
You will prompted to browse for the 3.9BL file. Click Yes then select the file(BL-39.bin) from the Pwnage folder you created on your desktop and click the Open button.

Select the file in the Pwnage folder on your desktop and click the Open button.

Do the same for 4.6.


***: After loading the 4.6 BL you may be asked if you're a legit user. If you legally have ATT or an iPhone plan in a different country, clicking yes will not unlock the iPhone and activate it as your legal plan already activates it and there is no need for an unlock. However if you wish to keep the iPhone unlocked, when asked if you're a legit iPhone user, click no
Step Nine
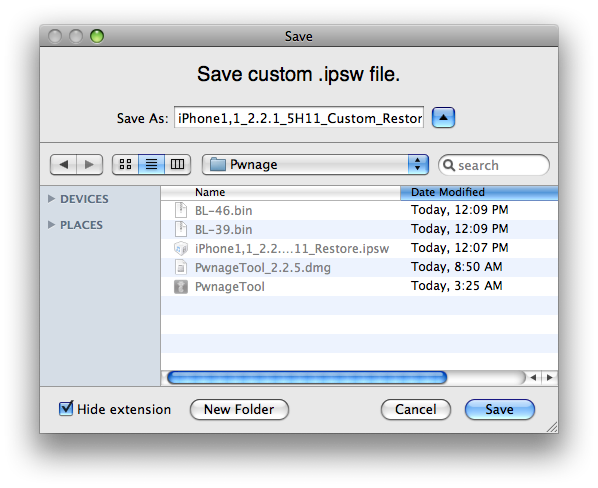
After both are found. You will be asked to save your custom .ipsw file. Save it to your Pwnage folder on the desktop.

Step Ten
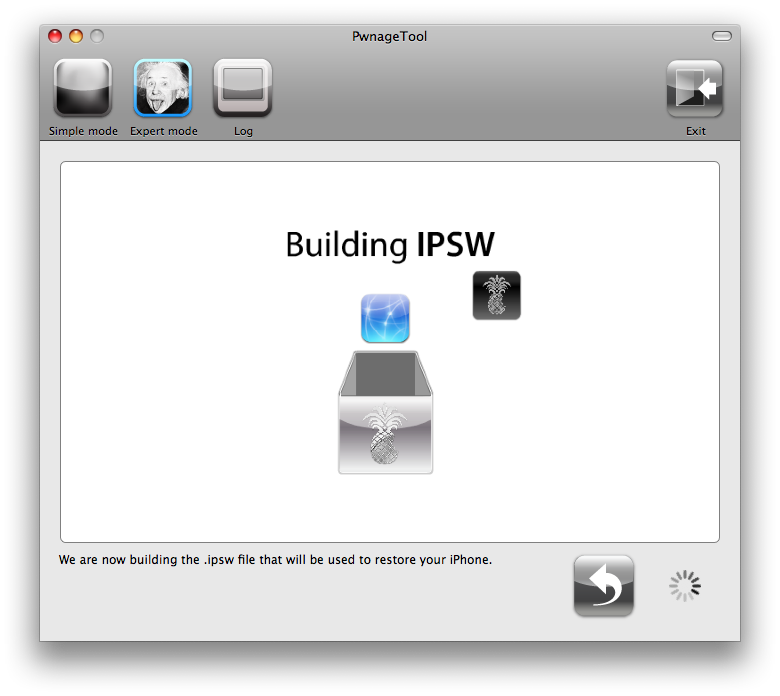
Your custom IPSW is now being built. Please allow up to 10 minutes.

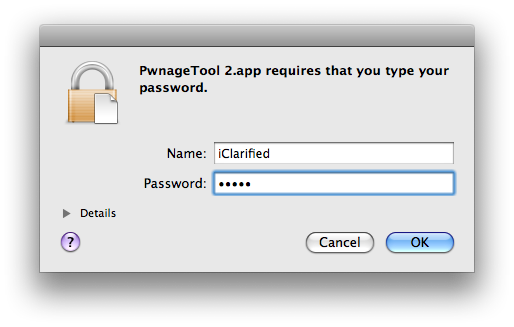
If prompted enter your Administrator password and click the OK button.

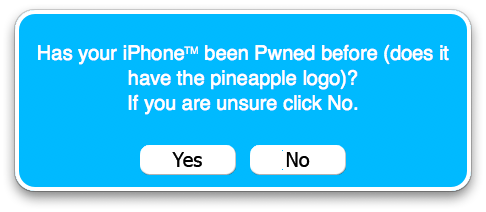
When prompted if your iPhone has been Pwned before, we clicked No. It allows for a more thorough restore.

You will be asked to turn off the device. Make sure it is connected to the USB port.

Step Eleven
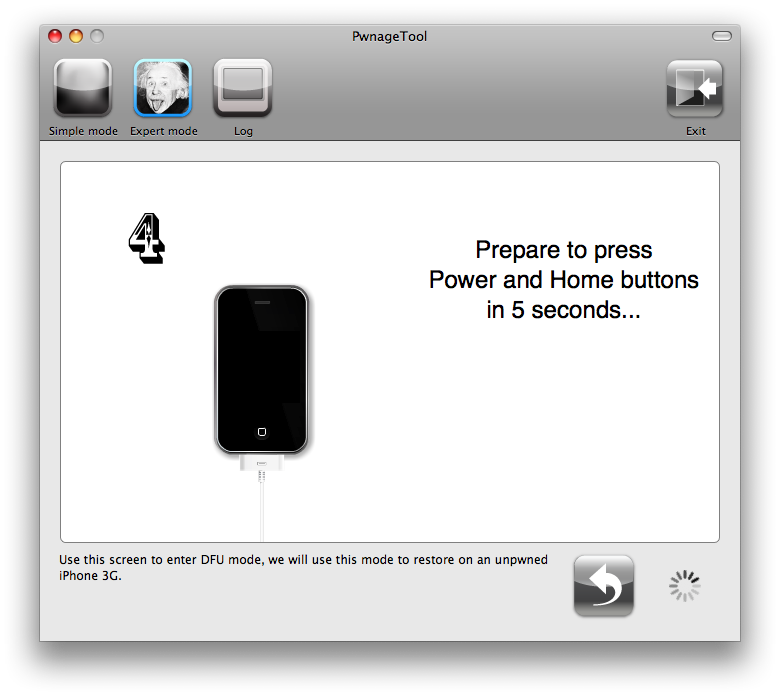
Be ready to follow directions now. It will ask you to hold the home button and the power button for 10 seconds. Then, you will have to release the power button and hold the home button for 10 seconds to enter DFU.

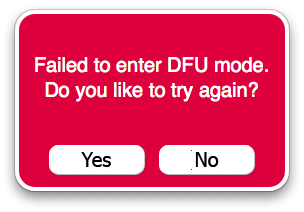
If you fail, it will show you a message. Click Yes. Unplug the iPhone from the USB. Turn it off, then turn it back on. Plug it back into the USB and turn off the iPhone when prompted.

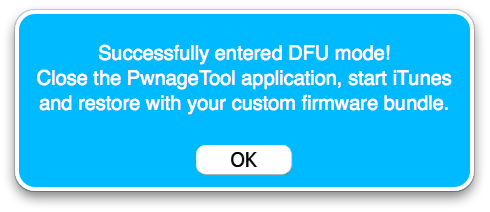
When done correctly, Pwnage 2.0 will display a message telling your that it successfully entered DFU mode. iTunes will also pop-up.


IMPORTANT***: If you have Mac OS X 10.5.6 you may have an issue with putting your iPhone into DFU mode. The easiest option is to use a USB hub between your iPhone and the computer. Another option is to run thisautomator script. NOTE*: Make sure the script completes properly. If the files are not replaced properly you will lose keyboard and mouse upon reboot. Later today we will post a third alternative for enabling DFU mode on your Mac.
Step Twelve
In iTunes, hold the Alt/Option button and click Restore.

Step Thirteen
Navigate to the Pwnage folder on your desktop using the dialog window that appears. Select the custom IPSW that was created (iPhone1,1_2.2.1_5H11_Custom_Restore.ipsw) and click the Open button.

Step Fourteen
Once the restore has completed, it will restart your iPhone. The phone will then launch BootNeuter.app to unlock your device.
Please allow 5 minutes for this to complete. Your iPhone will restart once completed.
Read More
You can find the 3G version of this tutorial: here. To locate the Windows version of the tutorial clickWindows
You need iTunes 8.0.2 to continue...
Watch the Video!For your convenience this tutorial is available in video format also. Click the Watch It button to view the tutorial!
Note: This video tutorial is for the 2.0.2 firmware but it still applies
Alright, first make a folder on the desktop. In it, you will need a couple of things. The two bootloader files3.9BL, 4.6BL, and Pwnage 2.2.5, found here or here
You will also need the 2.2.1 iPhone firmware.
2.2.1 (2G): iPhone1,1_2.2.1_5H1_Restore.ipsw
When downloading the IPSW file, it is best to download it with Firefox!
Step One
Create a folder on your desktop with all the required files listed above.
Step Two
Double click to mount the PwnageTool dmg.
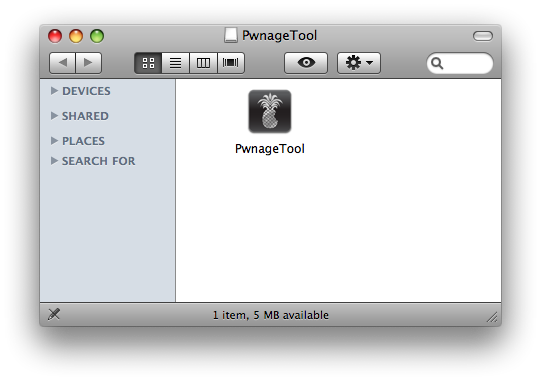
Drag the PwnageTool icon to the Pwnage folder then launch it.
Click Ok if presented with a warning.
Step Three
Make sure you click Expert Mode from the top menu.
Step Four
Select your iPhone or iPod from the three devices shown. Notice a large checkmark appears over the selected device. Then click the blue arrow button at the bottom right.
Step Five
You will be brought to the "Browse for IPSW" page. On my laptop, it automatically found the IPSW. If PwnageTool doesn't automatically find the ipsw file you can click Browse for IPSW... button.
Click to select the found IPSW file, a checkmark will appear next to it. Then click the blue arrow button to continue.
Step Six
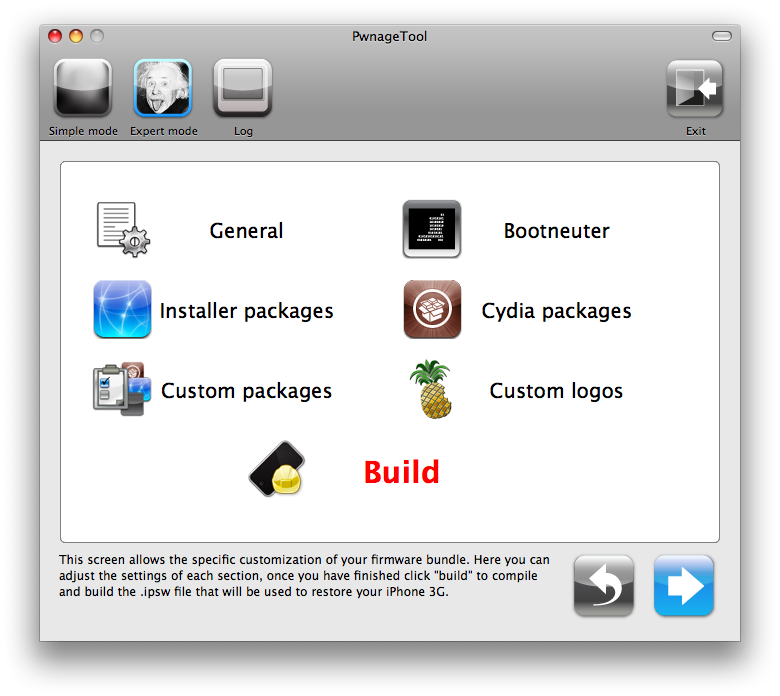
You will then be brought to a menu with 7 choices. Click to select General then click the blue arrow button.
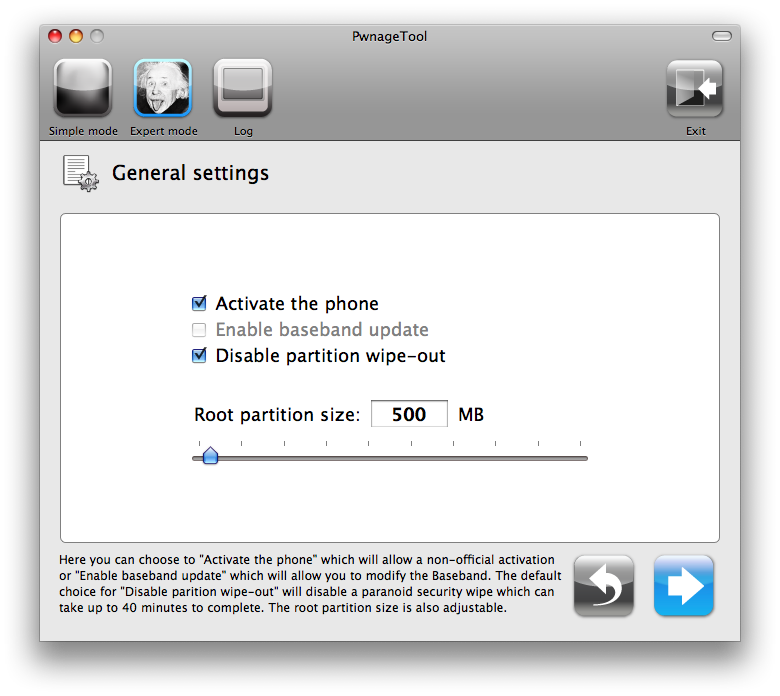
The General settings allows you to decide the partition size. Click activate the phone and Disable partition wipe-out. Click the blue arrow button.
***If the Enable Baseband checkbox is not greyed out, checkmark it. This will allow the unlock to occur!***
***For the 2.2.1 firmware you may have to increase the size of your root partition slightly for the IPSW build to be successful. 590MB worked just fine for me***
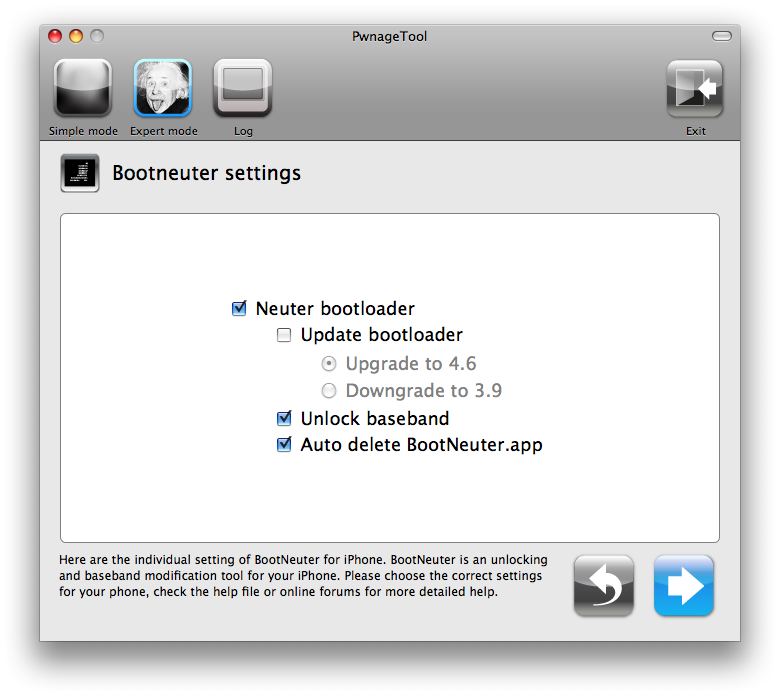
In the Bootneuter settings, click Neuter bootloader, Unlock baseband, and Auto-Delete BootNeuter.app. It is not necessary to upgrade the bootloader unless you are really feeling the need to be on 4.6. Click the blue arrow button to continue.
The Cydia settings menu allows you to create custom packages so you do not have to manually install the necessary them later.

Click to select the Download packages tab. Then click the Refresh button to display all the available packages. Double clicking the package you want will download it and make it available in the Select Packages tab.
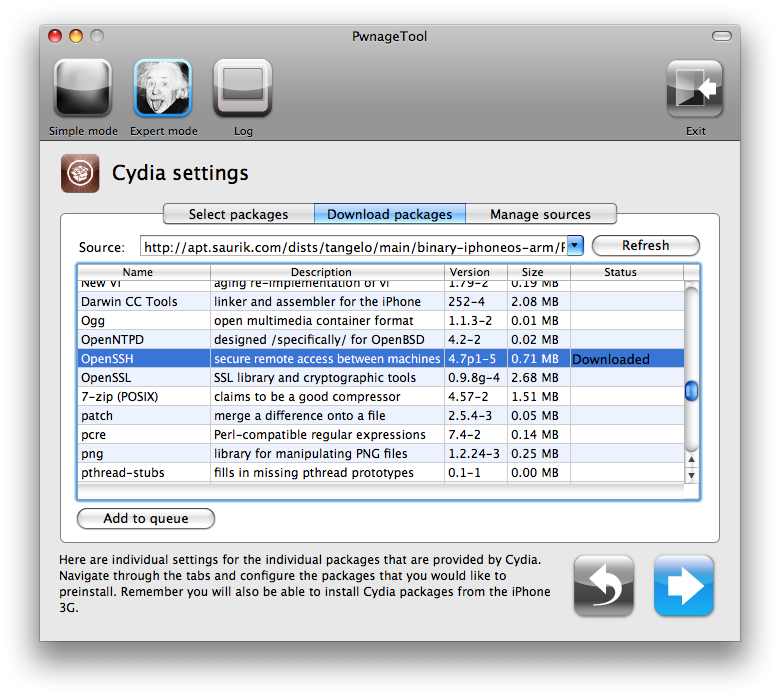
Checkmark the ones you want then Click the blue arrow button.
The Custom Packages Settings menu displays listed package settings for your custom IPSW. For know leave these settings as is. Click the blue arrow button to continue.
The Custom Logos Settings menu allows you to add your own images as boot logos. Click the Browse button to select your Boot logo and Recovery logo.
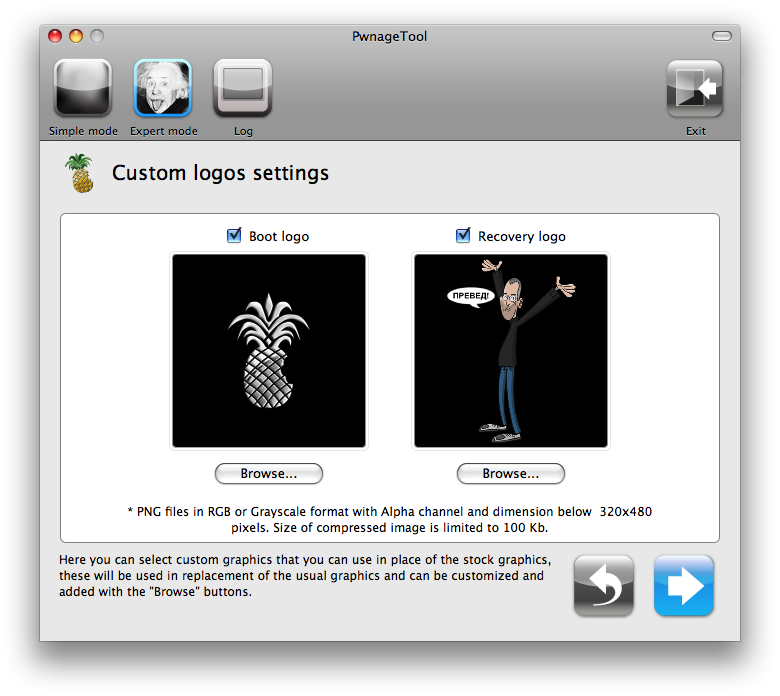
Remember the rules for them: RGB or Grayscale format with Alpha channel and dimension bellow 320x480. If you would like to use the iClarified ones they can be found here: Boot Logo, Recovery Logo
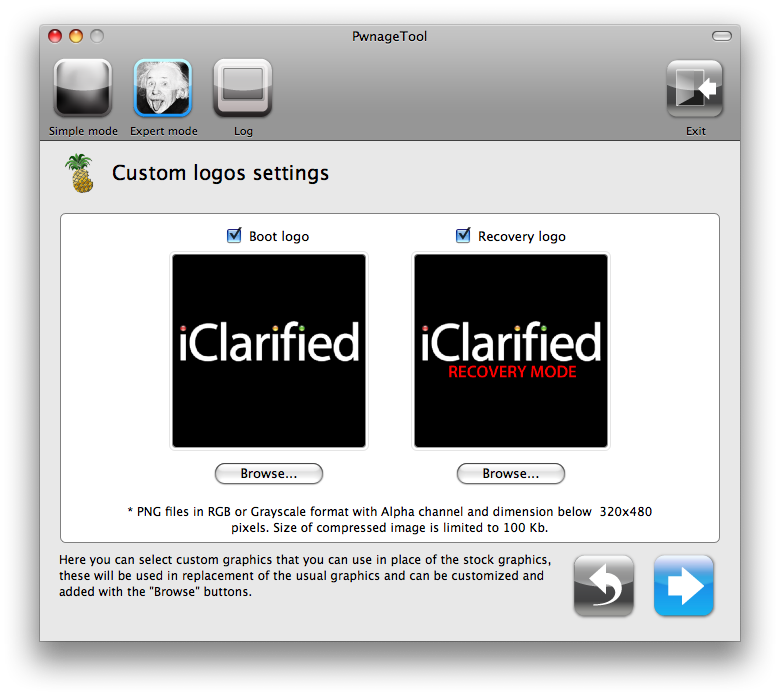
Click the blue arrow button to continue.
Step Seven
You are now ready to build your custom firmware. Click the build button to select it, then click the blue arrow button.
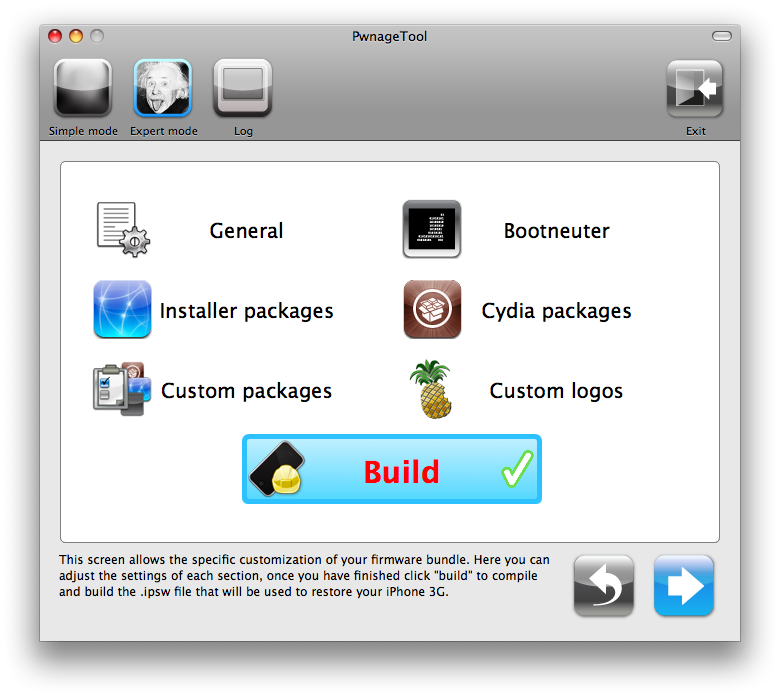
Step Eight
If this is the first time doing this, you will be asked to upload the 3.9 and 4.6 BL files. When prompted to search the web, click no.
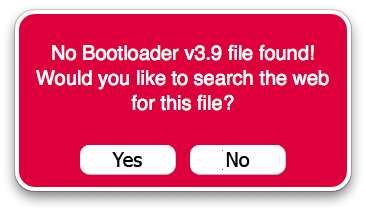
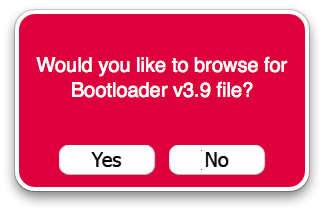
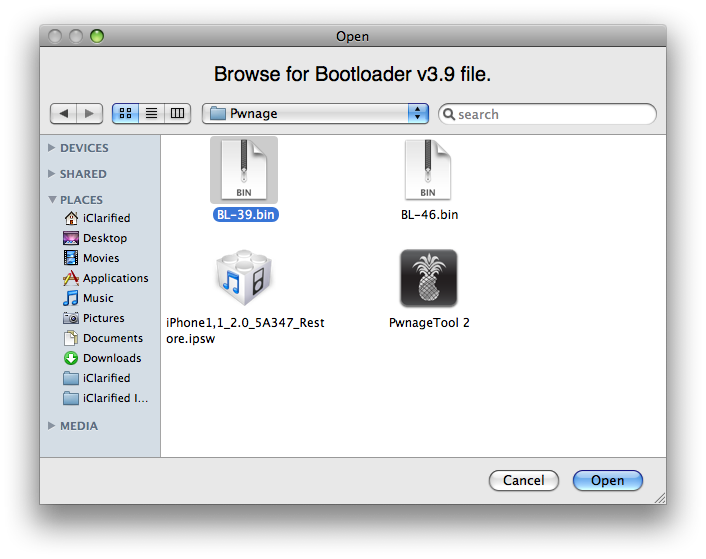
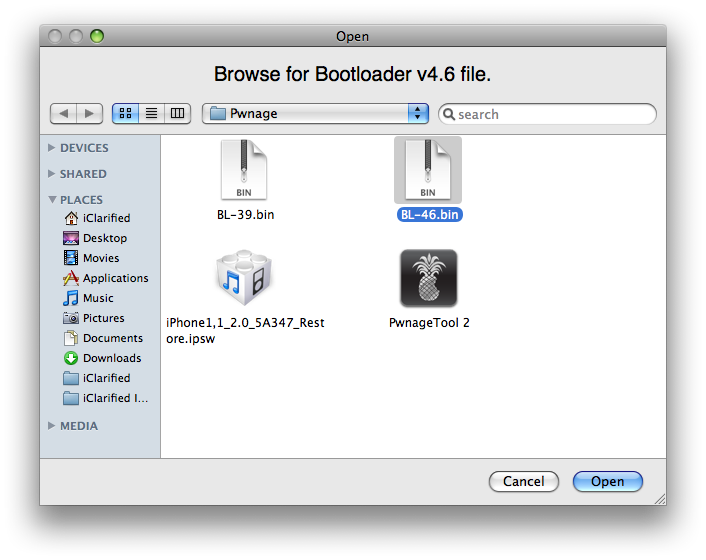
You will prompted to browse for the 3.9BL file. Click Yes then select the file(BL-39.bin) from the Pwnage folder you created on your desktop and click the Open button.
Select the file in the Pwnage folder on your desktop and click the Open button.
Do the same for 4.6.
***: After loading the 4.6 BL you may be asked if you're a legit user. If you legally have ATT or an iPhone plan in a different country, clicking yes will not unlock the iPhone and activate it as your legal plan already activates it and there is no need for an unlock. However if you wish to keep the iPhone unlocked, when asked if you're a legit iPhone user, click no
Step Nine
After both are found. You will be asked to save your custom .ipsw file. Save it to your Pwnage folder on the desktop.
Step Ten
Your custom IPSW is now being built. Please allow up to 10 minutes.
If prompted enter your Administrator password and click the OK button.
When prompted if your iPhone has been Pwned before, we clicked No. It allows for a more thorough restore.
You will be asked to turn off the device. Make sure it is connected to the USB port.
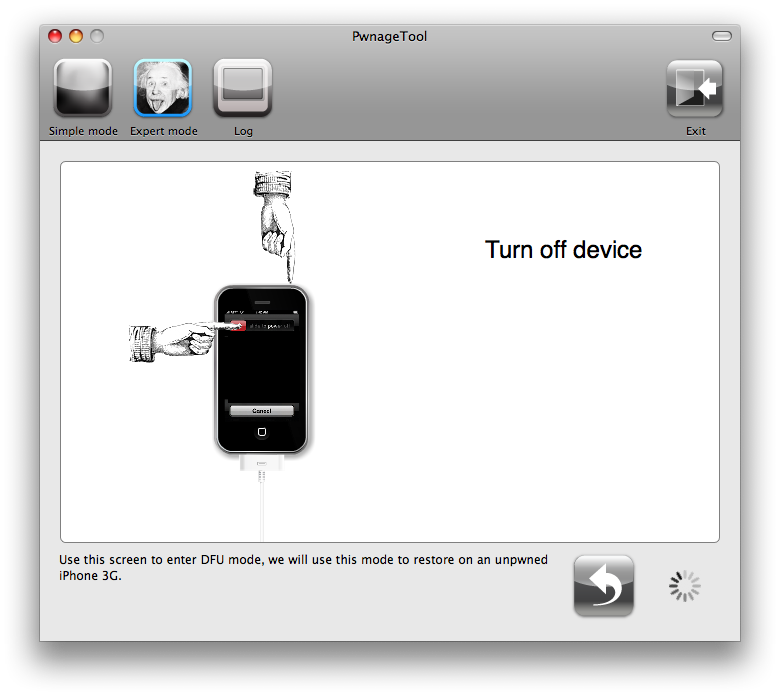
Step Eleven
Be ready to follow directions now. It will ask you to hold the home button and the power button for 10 seconds. Then, you will have to release the power button and hold the home button for 10 seconds to enter DFU.
If you fail, it will show you a message. Click Yes. Unplug the iPhone from the USB. Turn it off, then turn it back on. Plug it back into the USB and turn off the iPhone when prompted.
When done correctly, Pwnage 2.0 will display a message telling your that it successfully entered DFU mode. iTunes will also pop-up.
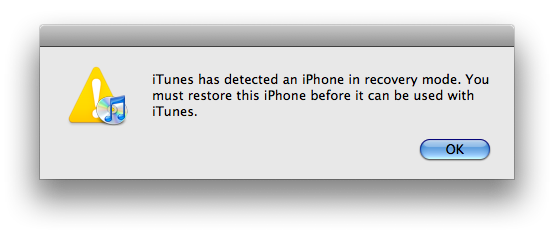
IMPORTANT***: If you have Mac OS X 10.5.6 you may have an issue with putting your iPhone into DFU mode. The easiest option is to use a USB hub between your iPhone and the computer. Another option is to run thisautomator script. NOTE*: Make sure the script completes properly. If the files are not replaced properly you will lose keyboard and mouse upon reboot. Later today we will post a third alternative for enabling DFU mode on your Mac.
Step Twelve
In iTunes, hold the Alt/Option button and click Restore.
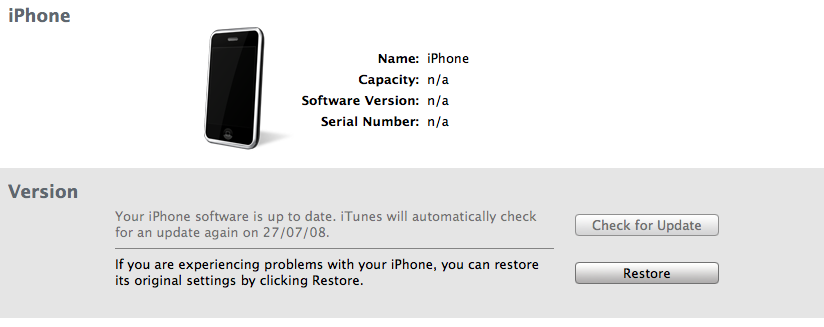
Step Thirteen
Navigate to the Pwnage folder on your desktop using the dialog window that appears. Select the custom IPSW that was created (iPhone1,1_2.2.1_5H11_Custom_Restore.ipsw) and click the Open button.
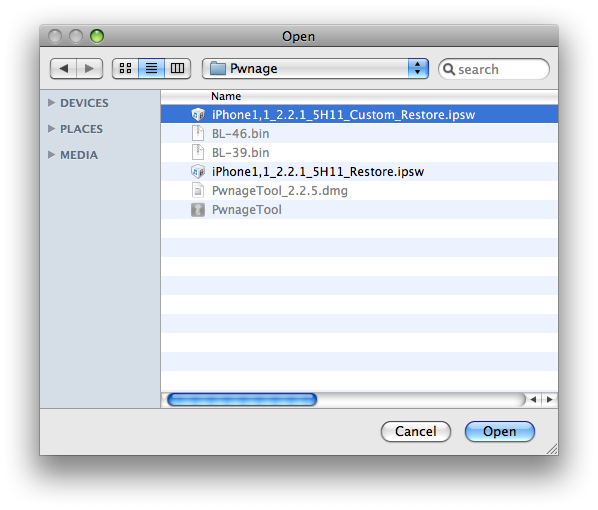
Step Fourteen
Once the restore has completed, it will restart your iPhone. The phone will then launch BootNeuter.app to unlock your device.
Please allow 5 minutes for this to complete. Your iPhone will restart once completed.


![[IMG]](http://media.tinhte.vn/photo/var/albums/DuyLuan/Screen%20Shot%202012-03-17%20at%206.03.56%20AM.jpg?m=1331939193)
![[IMG]](https://lh3.googleusercontent.com/blogger_img_proxy/AEn0k_uq4B0CXLImo_da1xRAoX33MA7IEhGaXr2s9acYzZdNvvByikzu4C7uUonWu0jex9DOOFaLV-wu3y6S8dUAa6qlrs72vr8NI8h8dP6AjLk4XLfVY3CafuuYVV_8CSvgbNTF2PCwUhUIAimZKlw8=s0-d)
![[IMG]](https://lh3.googleusercontent.com/blogger_img_proxy/AEn0k_uBQ7orh5G4WmgM64sa6BcgxdSlxvvnYgzOWqtcoeJzcodoQ6G6Vc0TrDmoiZyYD1JEQIXtqtBvWqdmCVy1jx9NM3ApV8vZTVexfHlreEhY0U6vuy4QxTgxJcGWO7ir_JCorxagsxRGt_EHR-0F=s0-d)
![[IMG]](https://lh3.googleusercontent.com/blogger_img_proxy/AEn0k_u1IrG9nKVHv2_zx4SVGZ3hck5DPy8zYTAv9NRjGk751qpQa0BJ1Frz1p0NICRp2c4Eb-QQ9OxIXgLhM12N2JCszYEam3Te7mQ98LSXNPgsHfrddNvsz2M6H7YuDhZFxQyyzB7upbWd-fNxjL4cUd7I6JFG-UQ9s90YUcXZAw=s0-d)


