Hiển thị các bài đăng có nhãn convert. Hiển thị tất cả bài đăng

Thứ Bảy, 11 tháng 8, 2012

How To Sync ITunes From Mac To Android [Quicktip]

Source : Internet

Ever had the problem of getting your iTunes music from your Mac to your Android phone? Copying from one storage source to the other is fine, but it doesn’t need to be a hassle. You can actually set your iTunes to sync between your Mac and your phone with the help of doubleTwist.
DoubleTwist Screenshot
doubleTwist is a multiplayer application almost like your iTunes on Mac. It can play music and video, but it also has a photo gallery and it makes syncing iTunes to your Android so much easier.

1. Download DoubleTwist On Mac

To start syncing iTunes on your Mac with your Android phone, download doubleTwist for Mac on your machine and doubleTwist App for Android on your phone.
Firstly, download doubleTwist for Mac on your Mac machine and open the DMG file from your download folder, follow through with the drag instruction.
DoubleTwist for Mac
Now open your Applications folder on Mac and open the doubleTwist application.
DoubleTwist Folder
Since this is your first time installing doubleTwist, you will be prompted with a warning since the application is downloaded from the Internet. Click ‘Open’ to proceed.
DoubleTwist Download Warning
Now the ‘End User License Agreement’ will pop up, read through it and click on ‘Accept’.
DoubleTwist Agreement
Once you have accepted, and the download is complete, you can start using DoubleTwist to play music on your Mac, view photo albums and watch videos too.

2. Download DoubleTwist On Your Android Phone

Go to the Android market and search for doubleTwist for Android to download it into your phone.
DoubleTwist on Android
When the download is complete, open the application and tap on the ‘Continue’ button to continue to the main screen.
DoubleTwist after download
You will have an option to email the Mac and PC download link to your email Inbox, if you have not downloaded the application on your computer.

3. Connect Android With Mac

When installation is done on both your Mac and Android phone, use your phone’s USB cable to connect the two devices. On your Android phone screen, you will be prompted to select the connection type; select ‘Disk Drive’.
DoubleTwist Diskdrive
Once connected, you will be able to see a new storage button on your Mac screen.
Android storage

4. Sync Your Android Storage

Your installed doubleTwist application recognizes your Android storage, so when you open your doubleTwist application, you will see an instruction to sync your iTunes music with your phone. You can choose to sync music, photos and videos.
To sync music, select ‘Sync music to device’. Choose to sync all music and click on the ‘Sync’ button to proceed.
DoubleTwist Sync Music
When the process is done, you will be able to check if the sync process was successful. On the left menu of doubleTwist on your Mac, there is a device menu name which refers to your android phone. In this example, it is ‘HTC Android Phone’. Click on the submenu ‘Music’ to check on your music list.
DoubleTwist Music List
When your music list is updated, you can now listen to your music from your Android phone.
DoubleTwist Play on Android

Conclusion

With doubleTwist, now you can easily sync your iTunes music with your Android phone without having to copy music from your computer to your Android phone storage all the time. Not only that, you are also getting a multiplayer application where you can play music, watch videos as well as view photo galleries.
Read More


Thứ Ba, 24 tháng 7, 2012

How to Convert H.264 MKV Files to MP4 Without Re-encoding (Mac)

Source : Internet

These are instructions on how to convert H.264 MKV files to MP4 without re-encoding. 


Following this procedure will save you lots of time and prevent video quality degradation if you need video in mp4 format for playback through iTunes, the Apple TV, or on your iOS device.

***We have posted an easier version of this tutorial here, we suggest that most users follow that tutorial instead.***


IDENTIFY THE SOURCE VIDEO AND AUDIO
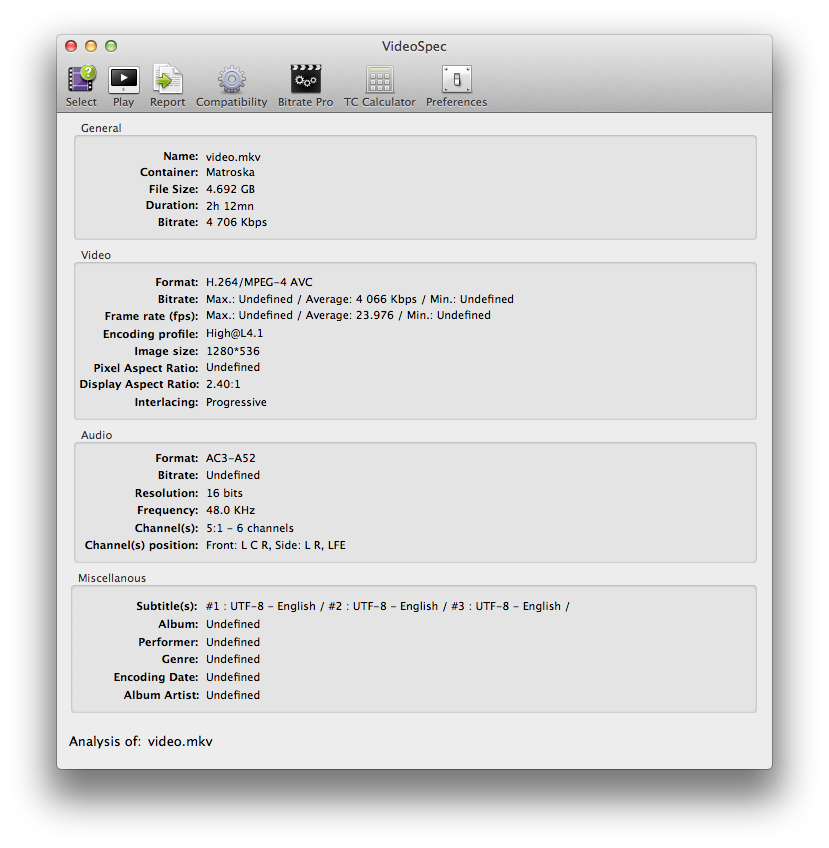
Before beginning lets get some details on the source video and audio.

Step One
Download and install VideoSpec to your Applications folder from here.

Step Two
Launch VideoSpec from your Applications folder.


Step Three
Click Select from the toolbar.


Step Four
Choose your .mkv file and click Open.


Step Five
Make sure the video format is H.264 and take note of the Frame Rate (fps) and Audio Format.


Important: Make note of the Encoding Profile. Some older Apple devices only support the Main profile so if your video is High Profile this procedure may not work. The new Apple TV supports High Profile at Level 4.0; however, we have tested level 4.1 and it worked fine in all attempts. The iPhone and iPad support High Profile level 4.1.


EXTRACT VIDEO AND AUDIO FROM MKV
Demux (ie extract) the video and audio tracks from the MKV container format.

Step One
Download and install iMKVExtract from here to your applications folder.


Step Two
Launch iMKVExtract and click the Browse button to select your Matroska file.


Step Three
Select your mkv file and click the Choose button.


Step Four
Select the video and audio track for extraction. These are usually track one and track two.


Change the target folder if need be and click the Extract button.

Step Five
iMKVExtract will let you know when the extraction is complete.


CONVERT AUDIO TO AAC
If the audio track you extracted is NOT in AAC format than you will need to convert it. If it is in AAC format then you can skip this section.

Step One
You can use your favorite application to convert the audio or try Audio-Converter which can be downloaded from the Mac App Store here.

Step Two
Launch Audio-Converter from the Applications folder.


Step Three
Set the Convert To: dropdown to AAC then set the destination folder to the folder than contains the files we extracted earlier.


Step Four
Drop the audio file that was extracted from the mkv into Audio-Converter to begin conversion. Note: the audio files will likely be named audio2.ac3 or audio2.dts.


COMBINE VIDEO AND AUDIO INTO MP4 FILE
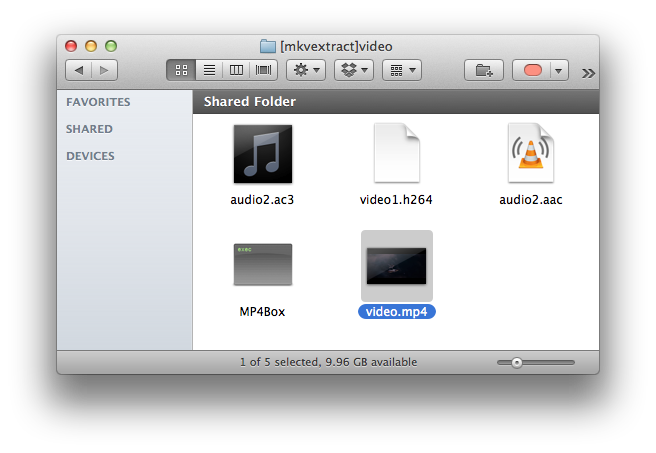
Mux the .h264 video and the .aac audio file into a mp4 file using MP4Box.

Step One
Download MP4Box from here and save it to the same folder as your extracted video and audio. Double click to extract the archive if need be.


Step Two
Open a new Terminal window from Applications:Utilities.


Step Three
Navigate to the folder your video and audio is located in.
ie. cd ~/Desktop/[mkvextract]video


Step Four
Execute the command to create a MP4 video. Make sure to specify the frame rate we noted earlier or your audio will be out of sync. Also be sure to use the .aac audio file and not the original.

ie. ./MP4Box -fps 23.976 -add video1.h264 -add audio2.aac video.mp4


Step Five
MP4Box will now combine the video and audio tracks into a mp4 that can be added to iTunes!


Read More


Thứ Hai, 2 tháng 7, 2012

How To Turn Your IPhone Into A Temporary Keyboard And Mouse

Source : internet

Having the flexibility to remotely control your mouse and keyboard is a seamless experience. Sure, it can be done with devices like a Bluetooth keyboard or mouse, but when doing a very importantpresentation on a big stage, or lying on a couch watching an exciting game on your 42″ TV monitor linked to your computer, you’d want to take comfort into account, won’t you?

LogitechTouchMouse How To Turn Your IPhone into a Temporary Keyboard And Mouse
No doubt everyone’s comfortable with the thought of using the common mouse to control your cursor, and the keyboard for typing, but who can say that having the same control of both cursor and typing abilities from a phone is not more interesting?
Yes there is an app to turn your iPhone into a functional mouse or keyboard, and that’s whenTouchMouse comes in handy. TouchMouse is a free iOS app, which will allow you to remotely control your cursor as well as provide an alternative keyboard.

Turning Phone To Mouse And Keyboard

In this tutorial, we will guide you through the steps of turning your iPhone into a mouse and keyboard.

1. Install TouchMouse On Computer

The first thing you need to do is to install TouchMouse on your computer. TouchMouse is available for PC and Mac. Head over to the download page and proceed to installation.
Install How To Turn Your IPhone into a Temporary Keyboard And Mouse

2. Install TouchMouse On IPhone

The second step you need to do is to install TouchMouse on your iPhone device from the iTunes store.

3. Connect Your Computer To The IPhone

You need to connect the two devices to the same hotspot. Switch on the iPhone’s built-in hotspot, and connect your computer to the same hotspot.
hotspot How To Turn Your IPhone into a Temporary Keyboard And Mouse

4. Launch TouchMouse From IPhone

When the installation and connection has been set up, launch TouchMouse app from your iPhone and your computer will be visible for selection. Tap on your computer name on the list to start using it.
TouchMouse How To Turn Your IPhone into a Temporary Keyboard And Mouse
Now your iPhone is ready to control your computer’s mouse and keyboard. You can use TouchMouse for pointing, clicking and scrolling, as well as typing.

Using TouchMouse

TouchMouse is a simple app with clear functions that mirror those of the mouse’s: point, click and scroll. On the click pad are 3 buttons for the left click, center click and right click functions.
trackpad How To Turn Your IPhone into a Temporary Keyboard And Mouse
You can also use the Trackpad insetad of clicking the pad. The trackpad works with the following styles:
  1. Tap once – return a single click
  2. Tap twice – return a double click
  3. Tap with two fingers – return a right-click
  4. Two fingers moving up and down – scrolling vertically
  5. Two fingers moving side to side – scrolling horizontally
For typing, simply click on the keyboard icon and your iPhone Qwerty keyboard will appear.

Conclusion

Having your iPhone remotely control your computer can leave a good impression with people; this understandably works great for (cool) presentations. The normal pointer device is definitely another alternative, but having all your controls in one device is definitely much easier.
For our Android phone lovers out there, we have another quicktip where you can turn your Android device into something similar. Stay tuned for that article coming up soon.
Read More


Return to top of page
Powered By Blogger | Design by Genesis Awesome | Blogger Template by Lord HTML